Flutter WebRTC: Connecting an App to a Realtime Avatar

You have a Flutter app and a voice agent. Set up WebRTC on both platforms, then put a live avatar on screen without writing a signaling server.

Michael Trehan

Founder, Protoface

Published

July 7, 2026

Updated

October 2, 2026

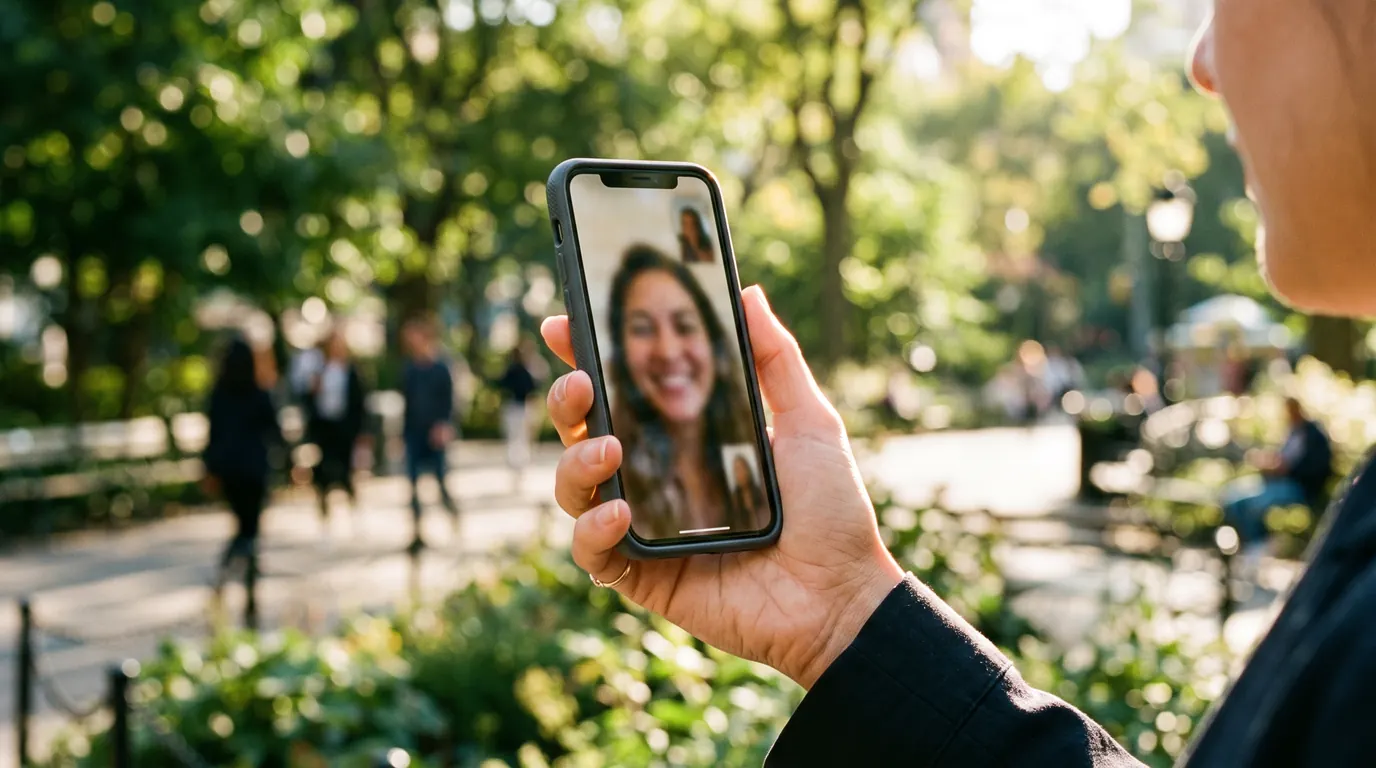
A hand holding a phone on a video call in a sunny city park
On this page

Flutter WebRTC means the flutter_webrtc plugin: one Dart API for peer connections, media streams and video renderers on iOS, Android, web and desktop. You capture the microphone, open an RTCPeerConnection, exchange an offer and answer over your own signaling channel, then draw the remote track in an RTCVideoView.

How Flutter WebRTC works

The plugin wraps the native WebRTC library on each platform and exposes the same objects a browser has. The flutter_webrtc package page lists audio, video, data channels and simulcast as supported on Android, iOS, web, macOS, Windows and Linux. What the plugin does not give you is signaling: your app and the other side still need a way to trade session descriptions and ICE candidates.

Most tutorials stop at a call between two phones. You are building something different: a Flutter screen where the user talks and a server-side AI avatar answers with live video and audio. The steps are the same until signaling, where a managed room replaces the server you would otherwise write.

The parts of the call:

  • Local stream. The microphone, and the camera only if the agent needs to see the user.

  • Peer connection. Carries encrypted media and picks a network path with ICE.

  • Signaling. Any channel that delivers the offer, the answer and the candidates.

  • Renderer. A texture the remote video track is painted on.

If the same avatar also has to run in a browser, the companion article covers adding a realtime AI avatar to a React or Angular app.

Setting up flutter_webrtc on iOS and Android

Add the dependency, declare camera and microphone use on both platforms, and set the Android minimum SDK to 23 if your project is lower. The permission entries and Gradle settings come from the plugin's README at version 1.6.2+hotfix.3.

iOS: Info.plist

Add both usage strings to ios/Runner/Info.plist. iOS terminates an app that opens the microphone or camera without them.

<key>NSCameraUsageDescription</key>
<string>$(PRODUCT_NAME) uses your camera</string>
<key>NSMicrophoneUsageDescription</key>
<string>$(PRODUCT_NAME)

<key>NSCameraUsageDescription</key>
<string>$(PRODUCT_NAME) uses your camera</string>
<key>NSMicrophoneUsageDescription</key>
<string>$(PRODUCT_NAME)

<key>NSCameraUsageDescription</key>
<string>$(PRODUCT_NAME) uses your camera</string>
<key>NSMicrophoneUsageDescription</key>
<string>$(PRODUCT_NAME)

The audio background mode is optional and comes from the LiveKit Flutter README. It keeps a voice call running when the user switches apps. For an audio-only agent you can leave the camera key out.

Android: manifest and Gradle

Put the permissions in android/app/src/main/AndroidManifest.xml:

<uses-feature android:name="android.hardware.camera" />
<uses-feature android:name="android.hardware.camera.autofocus" />
<uses-permission android:name="android.permission.CAMERA" />
<uses-permission android:name="android.permission.RECORD_AUDIO" />
<uses-permission android:name="android.permission.ACCESS_NETWORK_STATE" />
<uses-permission android:name="android.permission.CHANGE_NETWORK_STATE" />
<uses-permission android:name="android.permission.MODIFY_AUDIO_SETTINGS"

<uses-feature android:name="android.hardware.camera" />
<uses-feature android:name="android.hardware.camera.autofocus" />
<uses-permission android:name="android.permission.CAMERA" />
<uses-permission android:name="android.permission.RECORD_AUDIO" />
<uses-permission android:name="android.permission.ACCESS_NETWORK_STATE" />
<uses-permission android:name="android.permission.CHANGE_NETWORK_STATE" />
<uses-permission android:name="android.permission.MODIFY_AUDIO_SETTINGS"

<uses-feature android:name="android.hardware.camera" />
<uses-feature android:name="android.hardware.camera.autofocus" />
<uses-permission android:name="android.permission.CAMERA" />
<uses-permission android:name="android.permission.RECORD_AUDIO" />
<uses-permission android:name="android.permission.ACCESS_NETWORK_STATE" />
<uses-permission android:name="android.permission.CHANGE_NETWORK_STATE" />
<uses-permission android:name="android.permission.MODIFY_AUDIO_SETTINGS"

In the app-level build.gradle, set Java 8 compatibility and the minimum SDK:

android {
    compileOptions {
        sourceCompatibility JavaVersion.VERSION_1_8
        targetCompatibility JavaVersion.VERSION_1_8
    }
    defaultConfig {
        minSdkVersion 23

android {
    compileOptions {
        sourceCompatibility JavaVersion.VERSION_1_8
        targetCompatibility JavaVersion.VERSION_1_8
    }
    defaultConfig {
        minSdkVersion 23

android {
    compileOptions {
        sourceCompatibility JavaVersion.VERSION_1_8
        targetCompatibility JavaVersion.VERSION_1_8
    }
    defaultConfig {
        minSdkVersion 23

For Bluetooth headsets the README adds BLUETOOTH and BLUETOOTH_ADMIN with android:maxSdkVersion="30". Release builds need the Proguard rules the README links.

Getting microphone and camera access

Call navigator.mediaDevices.getUserMedia with a constraints map. The first call shows the system permission prompt, and the returned MediaStream holds the tracks you will send.

import 'package:flutter_webrtc/flutter_webrtc.dart';

// Voice agent: microphone only.
Future<MediaStream> openMic() {
  return navigator.mediaDevices.getUserMedia({'audio': true, 'video': false});
}

// Video call: microphone plus the front camera.
Future<MediaStream> openMicAndCamera() {
  return navigator.mediaDevices.getUserMedia({
    'audio': true,
    'video': {'facingMode': 'user'},
  });
}
import 'package:flutter_webrtc/flutter_webrtc.dart';

// Voice agent: microphone only.
Future<MediaStream> openMic() {
  return navigator.mediaDevices.getUserMedia({'audio': true, 'video': false});
}

// Video call: microphone plus the front camera.
Future<MediaStream> openMicAndCamera() {
  return navigator.mediaDevices.getUserMedia({
    'audio': true,
    'video': {'facingMode': 'user'},
  });
}
import 'package:flutter_webrtc/flutter_webrtc.dart';

// Voice agent: microphone only.
Future<MediaStream> openMic() {
  return navigator.mediaDevices.getUserMedia({'audio': true, 'video': false});
}

// Video call: microphone plus the front camera.
Future<MediaStream> openMicAndCamera() {
  return navigator.mediaDevices.getUserMedia({
    'audio': true,
    'video': {'facingMode': 'user'},
  });
}

Use the audio-only version for an avatar. The avatar's face is driven by the agent's audio, so the user's camera adds a permission prompt and upload bandwidth for nothing unless your agent uses vision. Wrap the call in try and catch: a denied permission throws, and your screen should say so and offer a retry.

Creating the peer connection and renderers

Create the renderer first, then the connection, then attach your tracks and an onTrack handler. An RTCVideoRenderer must be initialized before it receives a stream and disposed when the screen closes.

final remoteRenderer = RTCVideoRenderer();

Future<RTCPeerConnection> openConnection(MediaStream mic) async {
  await remoteRenderer.initialize();
  final pc = await createPeerConnection({
    'iceServers': [
      {'urls': 'stun:stun.example.com:3478'},
    ],
    'sdpSemantics': 'unified-plan',
  });
  for (final track in mic.getTracks()) {
    await pc.addTrack(track, mic);
  }
  await pc.addTransceiver(
    kind: RTCRtpMediaType.RTCRtpMediaTypeVideo,
    init: RTCRtpTransceiverInit(direction: TransceiverDirection.RecvOnly),
  );
  pc.onTrack = (event) {
    if (event.track.kind == 'video' && event.streams.isNotEmpty) {
      remoteRenderer.srcObject = event.streams[0];
    }
  };
  return pc;
}

Future<void> closeConnection(RTCPeerConnection pc, MediaStream mic) async {
  for (final track in mic.getTracks()) {
    await track.stop();
  }
  await mic.dispose();
  await pc.close();
  await pc.dispose();
  remoteRenderer.srcObject = null;
  await remoteRenderer.dispose();
}
final remoteRenderer = RTCVideoRenderer();

Future<RTCPeerConnection> openConnection(MediaStream mic) async {
  await remoteRenderer.initialize();
  final pc = await createPeerConnection({
    'iceServers': [
      {'urls': 'stun:stun.example.com:3478'},
    ],
    'sdpSemantics': 'unified-plan',
  });
  for (final track in mic.getTracks()) {
    await pc.addTrack(track, mic);
  }
  await pc.addTransceiver(
    kind: RTCRtpMediaType.RTCRtpMediaTypeVideo,
    init: RTCRtpTransceiverInit(direction: TransceiverDirection.RecvOnly),
  );
  pc.onTrack = (event) {
    if (event.track.kind == 'video' && event.streams.isNotEmpty) {
      remoteRenderer.srcObject = event.streams[0];
    }
  };
  return pc;
}

Future<void> closeConnection(RTCPeerConnection pc, MediaStream mic) async {
  for (final track in mic.getTracks()) {
    await track.stop();
  }
  await mic.dispose();
  await pc.close();
  await pc.dispose();
  remoteRenderer.srcObject = null;
  await remoteRenderer.dispose();
}
final remoteRenderer = RTCVideoRenderer();

Future<RTCPeerConnection> openConnection(MediaStream mic) async {
  await remoteRenderer.initialize();
  final pc = await createPeerConnection({
    'iceServers': [
      {'urls': 'stun:stun.example.com:3478'},
    ],
    'sdpSemantics': 'unified-plan',
  });
  for (final track in mic.getTracks()) {
    await pc.addTrack(track, mic);
  }
  await pc.addTransceiver(
    kind: RTCRtpMediaType.RTCRtpMediaTypeVideo,
    init: RTCRtpTransceiverInit(direction: TransceiverDirection.RecvOnly),
  );
  pc.onTrack = (event) {
    if (event.track.kind == 'video' && event.streams.isNotEmpty) {
      remoteRenderer.srcObject = event.streams[0];
    }
  };
  return pc;
}

Future<void> closeConnection(RTCPeerConnection pc, MediaStream mic) async {
  for (final track in mic.getTracks()) {
    await track.stop();
  }
  await mic.dispose();
  await pc.close();
  await pc.dispose();
  remoteRenderer.srcObject = null;
  await remoteRenderer.dispose();
}

The first function sends the microphone and asks to receive one video stream, the shape of a call with an avatar. The second releases the microphone, the connection and the renderer. The STUN address is a placeholder: use your own STUN and TURN servers.

Signaling: exchanging the offer and answer with the avatar API

Yes, you need signaling. MDN's signaling and video calling guide states that WebRTC does not specify a transport for it, so you either write a signaling server or use a platform whose SDK contains one.

Hand-built signaling over a WebSocket

If you own both ends, a WebSocket and three message types are enough. This version uses the web_socket_channel package:

import 'dart:convert';
import 'package:flutter_webrtc/flutter_webrtc.dart';
import 'package:web_socket_channel/web_socket_channel.dart';

Future<void> negotiate(RTCPeerConnection pc) async {
  final ws = WebSocketChannel.connect(Uri.parse('wss://example.com/signal'));
  await ws.ready;
  void send(Map<String, dynamic> msg) => ws.sink.add(jsonEncode(msg));

  pc.onIceCandidate = (c) => send({'type': 'candidate', 'candidate': c.toMap()});
  ws.stream.listen((data) async {
    final msg = jsonDecode(data as String);
    if (msg['type'] == 'answer') {
      await pc.setRemoteDescription(RTCSessionDescription(msg['sdp'], 'answer'));
    } else if (msg['type'] == 'candidate') {
      final c = msg['candidate'];
      await pc.addCandidate(
          RTCIceCandidate(c['candidate'], c['sdpMid'], c['sdpMLineIndex']));
    }
  });

  final offer = await pc.createOffer();
  await pc.setLocalDescription(offer);
  send({'type': 'offer', 'sdp': offer.sdp});
}
import 'dart:convert';
import 'package:flutter_webrtc/flutter_webrtc.dart';
import 'package:web_socket_channel/web_socket_channel.dart';

Future<void> negotiate(RTCPeerConnection pc) async {
  final ws = WebSocketChannel.connect(Uri.parse('wss://example.com/signal'));
  await ws.ready;
  void send(Map<String, dynamic> msg) => ws.sink.add(jsonEncode(msg));

  pc.onIceCandidate = (c) => send({'type': 'candidate', 'candidate': c.toMap()});
  ws.stream.listen((data) async {
    final msg = jsonDecode(data as String);
    if (msg['type'] == 'answer') {
      await pc.setRemoteDescription(RTCSessionDescription(msg['sdp'], 'answer'));
    } else if (msg['type'] == 'candidate') {
      final c = msg['candidate'];
      await pc.addCandidate(
          RTCIceCandidate(c['candidate'], c['sdpMid'], c['sdpMLineIndex']));
    }
  });

  final offer = await pc.createOffer();
  await pc.setLocalDescription(offer);
  send({'type': 'offer', 'sdp': offer.sdp});
}
import 'dart:convert';
import 'package:flutter_webrtc/flutter_webrtc.dart';
import 'package:web_socket_channel/web_socket_channel.dart';

Future<void> negotiate(RTCPeerConnection pc) async {
  final ws = WebSocketChannel.connect(Uri.parse('wss://example.com/signal'));
  await ws.ready;
  void send(Map<String, dynamic> msg) => ws.sink.add(jsonEncode(msg));

  pc.onIceCandidate = (c) => send({'type': 'candidate', 'candidate': c.toMap()});
  ws.stream.listen((data) async {
    final msg = jsonDecode(data as String);
    if (msg['type'] == 'answer') {
      await pc.setRemoteDescription(RTCSessionDescription(msg['sdp'], 'answer'));
    } else if (msg['type'] == 'candidate') {
      final c = msg['candidate'];
      await pc.addCandidate(
          RTCIceCandidate(c['candidate'], c['sdpMid'], c['sdpMLineIndex']));
    }
  });

  final offer = await pc.createOffer();
  await pc.setLocalDescription(offer);
  send({'type': 'offer', 'sdp': offer.sdp});
}

The app sends an offer, applies the answer, and trades candidates in both directions. Your server must send the answer before its candidates. The article on WebRTC vs WebSocket for realtime AI explains why the socket carries only these messages and never the media.

What changes with a realtime avatar

The Protoface docs describe no endpoint that accepts an SDP offer and list no Flutter SDK. The avatar reaches your app through a LiveKit room. Your backend creates a session, the avatar joins the room as a participant, and your Flutter app joins the same room with the LiveKit Flutter SDK, which runs the offer, answer and ICE exchange for you.
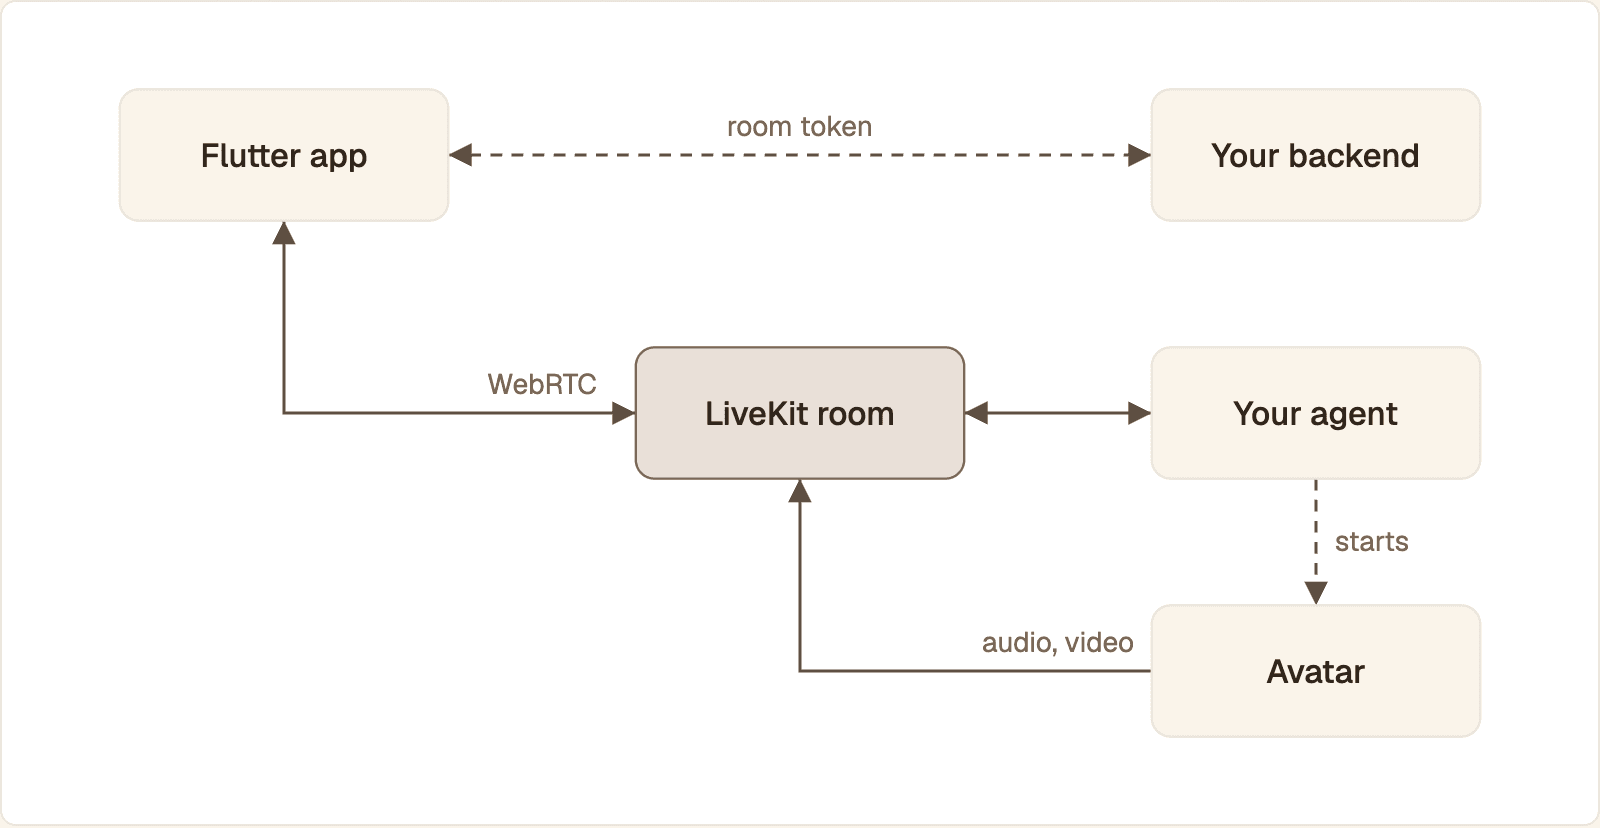
The Flutter app gets a room token from your backend and joins a LiveKit room, where the agent starts the avatar and the avatar publishes audio and video

The app never calls the avatar service. It asks your backend for a room token, joins the LiveKit room, and plays the tracks the avatar publishes there.

  1. The app asks your backend to start a conversation. No API key ships in the app.

  2. The backend mints a LiveKit access token for the user and returns it with the room URL. LiveKit's access tokens reference describes the token as a JWT signed with your API secret that encodes the participant's identity, the room name and permissions.

  3. Your agent starts the avatar. With the LiveKit Agents plugin that is protoface.AvatarSession and avatar.start(session, room=ctx.room). Without the plugin, the backend calls POST /v1/sessions.

  4. The app connects to the room. The SDK negotiates with the LiveKit server over its own secure WebSocket.

  5. The avatar joins as a participant and publishes audio and video. With the plugin its identity is protoface-avatar-agent.

  6. The app receives a subscribed-track event and renders the video.

The REST request for step 3 builds the session around a transport object:

curl -X POST https://api.protoface.com/v1/sessions \
  -H "Authorization: Bearer $PROTOFACE_API_KEY" \
  -H "Content-Type: application/json" \
  -d '{
    "avatar_id": "av_stock_001",
    "transport": {
      "type": "livekit",
      "url": "wss://your-project.livekit.cloud",
      "room_name": "demo-room",
      "worker_token": "LIVEKIT_JWT_FOR_THE_AVATAR"
    }
  }'
curl -X POST https://api.protoface.com/v1/sessions \
  -H "Authorization: Bearer $PROTOFACE_API_KEY" \
  -H "Content-Type: application/json" \
  -d '{
    "avatar_id": "av_stock_001",
    "transport": {
      "type": "livekit",
      "url": "wss://your-project.livekit.cloud",
      "room_name": "demo-room",
      "worker_token": "LIVEKIT_JWT_FOR_THE_AVATAR"
    }
  }'
curl -X POST https://api.protoface.com/v1/sessions \
  -H "Authorization: Bearer $PROTOFACE_API_KEY" \
  -H "Content-Type: application/json" \
  -d '{
    "avatar_id": "av_stock_001",
    "transport": {
      "type": "livekit",
      "url": "wss://your-project.livekit.cloud",
      "room_name": "demo-room",
      "worker_token": "LIVEKIT_JWT_FOR_THE_AVATAR"
    }
  }'

You mint worker_token yourself, so Protoface never sees your LiveKit secret. The default audio_source is data_stream, which the LiveKit Agents plugin uses. A custom agent that publishes its voice as an ordinary audio track sets it to track. The call returns at once with status: "queued" and a sess_... ID. Poll GET /v1/sessions/{id}: the status moves through starting to running, and first_frame_at is set when the first frame reaches the room. A 503 with code at_capacity carries a Retry-After header. The raw WebSocket transport in the schema is reserved and not available.

The Protoface Realtime integrations page lists the other agent stacks, and the protoface-quickstart repository indexes a starter project for each. None is a Flutter project: the Flutter side is plain LiveKit.

Keep both secrets on the server. The Protoface API key and the LiveKit API secret stay in your backend or agent process. The app receives only a short-lived room token.

Playing the avatar's video and audio stream

With raw flutter_webrtc, put RTCVideoView(remoteRenderer) in your widget tree and call setState after assigning srcObject. With LiveKit, pass the subscribed track to VideoTrackRenderer. Remote audio plays on its own in both cases.

// flutter_webrtc
RTCVideoView(
  remoteRenderer,
  objectFit: RTCVideoViewObjectFit.RTCVideoViewObjectFitCover,
)

// livekit_client
VideoTrackRenderer(avatarTrack, fit: VideoViewFit.cover)
// flutter_webrtc
RTCVideoView(
  remoteRenderer,
  objectFit: RTCVideoViewObjectFit.RTCVideoViewObjectFitCover,
)

// livekit_client
VideoTrackRenderer(avatarTrack, fit: VideoViewFit.cover)
// flutter_webrtc
RTCVideoView(
  remoteRenderer,
  objectFit: RTCVideoViewObjectFit.RTCVideoViewObjectFitCover,
)

// livekit_client
VideoTrackRenderer(avatarTrack, fit: VideoViewFit.cover)

Speaker or earpiece

A call-mode audio session can play through the earpiece, which sounds like silence when the phone is held at arm's length. With raw flutter_webrtc, call Helper.setSpeakerphoneOn(true) once the connection is up. LiveKit takes over the audio session: its audio session guide says speaker output is preferred by default and a wired or Bluetooth headset still wins. To change the route, call AudioManager.instance.setSpeakerOutputPreferred. Do not mix the two APIs, because LiveKit disables the plugin's own audio management when it loads.

Complete Flutter WebRTC example

This main.dart joins a LiveKit room, publishes the microphone and shows the remote video track the avatar publishes. It needs livekit_client in pubspec.yaml and the platform setup from earlier. Version 2.13.0 requires Flutter 3.38 and Dart 3.10 or later. The livekit_client package pins flutter_webrtc as a dependency, so the permissions are the same.

import 'package:flutter/material.dart';
import 'package:livekit_client/livekit_client.dart';

const url = String.fromEnvironment('LIVEKIT_URL');
const token = String.fromEnvironment('LIVEKIT_TOKEN');
void main() => runApp(const MaterialApp(home: AvatarCall()));

class AvatarCall extends StatefulWidget {
  const AvatarCall({super.key});
  @override
  State<AvatarCall> createState() => _AvatarCallState();
}

class _AvatarCallState extends State<AvatarCall> {
  final room = Room(roomOptions: const RoomOptions(adaptiveStream: true));
  late final EventsListener<RoomEvent> listener = room.createListener();
  VideoTrack? avatar;
  @override
  void initState() {
    super.initState();
    listener.on<TrackSubscribedEvent>((e) {
      final track = e.track;
      if (track is VideoTrack && mounted) setState(() => avatar = track);
    });
    room.connect(url, token).then(
        (_) => room.localParticipant?.setMicrophoneEnabled(true));
  }
  @override
  void dispose() {
    listener.dispose();
    room.disconnect().then((_) => room.dispose());
    super.dispose();
  }
  @override
  Widget build(BuildContext context) => Scaffold(
      body: avatar == null
          ? const Center(child: CircularProgressIndicator())
          : VideoTrackRenderer(avatar!));
}
import 'package:flutter/material.dart';
import 'package:livekit_client/livekit_client.dart';

const url = String.fromEnvironment('LIVEKIT_URL');
const token = String.fromEnvironment('LIVEKIT_TOKEN');
void main() => runApp(const MaterialApp(home: AvatarCall()));

class AvatarCall extends StatefulWidget {
  const AvatarCall({super.key});
  @override
  State<AvatarCall> createState() => _AvatarCallState();
}

class _AvatarCallState extends State<AvatarCall> {
  final room = Room(roomOptions: const RoomOptions(adaptiveStream: true));
  late final EventsListener<RoomEvent> listener = room.createListener();
  VideoTrack? avatar;
  @override
  void initState() {
    super.initState();
    listener.on<TrackSubscribedEvent>((e) {
      final track = e.track;
      if (track is VideoTrack && mounted) setState(() => avatar = track);
    });
    room.connect(url, token).then(
        (_) => room.localParticipant?.setMicrophoneEnabled(true));
  }
  @override
  void dispose() {
    listener.dispose();
    room.disconnect().then((_) => room.dispose());
    super.dispose();
  }
  @override
  Widget build(BuildContext context) => Scaffold(
      body: avatar == null
          ? const Center(child: CircularProgressIndicator())
          : VideoTrackRenderer(avatar!));
}
import 'package:flutter/material.dart';
import 'package:livekit_client/livekit_client.dart';

const url = String.fromEnvironment('LIVEKIT_URL');
const token = String.fromEnvironment('LIVEKIT_TOKEN');
void main() => runApp(const MaterialApp(home: AvatarCall()));

class AvatarCall extends StatefulWidget {
  const AvatarCall({super.key});
  @override
  State<AvatarCall> createState() => _AvatarCallState();
}

class _AvatarCallState extends State<AvatarCall> {
  final room = Room(roomOptions: const RoomOptions(adaptiveStream: true));
  late final EventsListener<RoomEvent> listener = room.createListener();
  VideoTrack? avatar;
  @override
  void initState() {
    super.initState();
    listener.on<TrackSubscribedEvent>((e) {
      final track = e.track;
      if (track is VideoTrack && mounted) setState(() => avatar = track);
    });
    room.connect(url, token).then(
        (_) => room.localParticipant?.setMicrophoneEnabled(true));
  }
  @override
  void dispose() {
    listener.dispose();
    room.disconnect().then((_) => room.dispose());
    super.dispose();
  }
  @override
  Widget build(BuildContext context) => Scaffold(
      body: avatar == null
          ? const Center(child: CircularProgressIndicator())
          : VideoTrackRenderer(avatar!));
}

Start the agent from the Protoface realtime quickstart, mint a token for the same room, then run:

flutter run --dart-define=LIVEKIT_URL=wss://your-project.livekit.cloud \
  --dart-define=LIVEKIT_TOKEN

flutter run --dart-define=LIVEKIT_URL=wss://your-project.livekit.cloud \
  --dart-define=LIVEKIT_TOKEN

flutter run --dart-define=LIVEKIT_URL=wss://your-project.livekit.cloud \
  --dart-define=LIVEKIT_TOKEN

In production, replace the two constants with a request to your backend. Add a catch on connect, a RoomDisconnectedEvent handler and a TrackUnsubscribedEvent handler that clears avatar. For full projects, the plugin's maintainers publish the flutter-webrtc-demo repository for peer-to-peer calls, and the LiveKit Flutter SDK ships a conferencing app in its example folder.

flutter_webrtc vs LiveKit and other SDKs

Use raw flutter_webrtc when you own both ends of a one-to-one link and want full control. Use a managed SDK when a server-side agent or avatar has to join the call, because the room, signaling and reconnection are already built.

Question

flutter_webrtc

LiveKit Flutter SDK

WebSocket only

Signaling

You build it

Built in

Not needed

Media handling

Native WebRTC

Native WebRTC, via flutter_webrtc

You write capture, playback and buffering

Servers you run

Signaling, STUN, TURN

A token endpoint

A socket server

Avatar or agent in the call

Only if it speaks your signaling

Joins the room as a participant

No video path

Best for

Custom peer-to-peer links

Voice agents and avatars

Text, events, transcripts

A WebSocket is the right tool for chat messages, transcripts and control events, and the wrong one for a user's microphone on a mobile network. The comparison of LiveKit vs WebSocket for realtime voice and video apps goes through that trade in detail.

Native Android in Kotlin

The architecture is identical without Flutter. Your backend mints the room token, the agent starts the avatar, and the app joins the room with the LiveKit Android SDK, which renders remote video in a SurfaceViewRenderer or TextureViewRenderer. Hold the room in a ViewModel, not the Activity, so a rotation does not drop the call. Request RECORD_AUDIO before you connect.

Session lifecycle on mobile

  • Debounce the start button. Two taps should not create two sessions. Avatar sessions count against your plan's concurrency cap.

  • End what you start. Disconnect when the screen closes. A Protoface session ends on POST /v1/sessions/{id}/end, at its duration cap, or after idle_timeout_seconds without audio from the agent. The default is 30 seconds.

  • Decide what backgrounding means. Keep the call with the audio background mode, or leave the room and rejoin on resume.

  • Keep app state out of the call. Lesson progress, itinerary or cart data belongs in your backend, so a reconnect does not lose it.

  • Offer a fallback. If the microphone is denied or the room fails, show text chat.

Common Flutter WebRTC errors and fixes

Most failures come from four places: a renderer that was never initialized, the audio route, a missing permission entry, or a network that blocks UDP.

Symptom

Likely cause

Fix

Black video

Renderer not initialized, or no rebuild after srcObject was set

Await initialize() first, then call setState

No audio on iOS

Sound is routed to the earpiece

Switch the route to the speaker and test on a real device

iOS app closes on start of call

Usage string missing from Info.plist

Add the microphone and camera keys

getUserMedia throws on Android

Permission missing from the manifest, or denied by the user

Add the permission, or send the user to app settings

Camera fails in the iOS simulator

The simulator has no camera

Test audio-only there, video on a device

ICE fails or never connects

No TURN relay on a network that blocks UDP

Add a TURN server that listens on TLS port 443

Release build crashes on Android

WebRTC classes stripped by code shrinking

Add the plugin's Proguard rules

No avatar participant appears

The agent is in a different room

Confirm the agent and the app use the same LiveKit room

Avatar joins but stays silent

The agent is not producing speech

Check the agent's speech output first

Measure connection time on your own devices

Log a timestamp when the user taps start, when connect returns and when the first video track is subscribed. Compare the last one with first_frame_at on the Protoface session to see how much of the wait is the avatar starting and how much is the network. Repeat on Wi-Fi and on mobile data.

Common questions

Does flutter_webrtc work on web and desktop as well as iOS and Android?

Yes. The flutter_webrtc package page lists audio, video and data channels as supported on Android, iOS, web, macOS, Windows and Linux. Speaker and earpiece switching only applies on phones.

Do I need a signaling server for Flutter WebRTC?

Yes, something has to carry the offer, the answer and the ICE candidates between the two sides. You can write one over a WebSocket, or use a platform SDK such as LiveKit that includes signaling and leaves you with a token endpoint.

Should I use flutter_webrtc directly or the LiveKit Flutter SDK?

Use flutter_webrtc directly for a one-to-one link where you control both ends. Use the LiveKit Flutter SDK when a server-side voice agent or avatar joins the call, because it is built on flutter_webrtc and adds rooms, signaling and reconnection.

When should a Flutter app use WebSocket instead of WebRTC?

Use a WebSocket for text, transcripts, events and other data that must arrive complete and in order. Use WebRTC for the user's microphone and for live video, where late packets should be skipped and echo cancellation matters.

Is WebRTC the right choice for a Flutter voice or video app?

Yes for live two-way audio and video. It gives you echo cancellation, a jitter buffer and congestion control on mobile networks. For one-way playback of recorded media, ordinary HTTP streaming is simpler.

Where can I find a Flutter WebRTC example on GitHub?

The plugin's maintainers publish the flutter-webrtc-demo repository for peer-to-peer calls. For a room with a server-side agent, the LiveKit Flutter SDK repository includes a conferencing app in its example folder.

Put a face on the agent your Flutter app already calls

Protoface Realtime joins your LiveKit room as a participant and turns your agent's audio into live avatar video. Your Flutter app renders it like any other track.
Start free or see the integrations.

Michael Trehan

Founder, Protoface

Michael is the founder of Protoface. He was previously a software engineer at Radiant Nuclear and worked in investment banking at JP Morgan.

Keep reading